Introduction: Cyanotype Photography Using a Box Camera
Hello fellow makers,
In this Instructable we will be looking at another way you can put a restored box style camera like the popular Kodak Brownie models I'm using.
By using cyanotype sensitized photopaper instead of the standard Kodak 620 film that is difficult to obtain and even more difficult to develop we can now take and develop cyanotype negatives at home with some simple chemistry.
The standard cyanotype formula is a great science experiment to do with your kids at home or in the classroom.
![]()
If you enjoy my Instructables and would like to support my future projects you can Buy Me A Coffee.
Step 1: What You Will Need:
To make your own you will need the following:


You can also buy premixed cyanotype mixtures - Amazon
- Ammonium Iron Citrate (NH4)5[Fe(C6H4O7)2]
Amazon - Jacquard Ferric Ammonium Citrate 8Oz
- Potassium Ferricyanide C6FeK3N6
Amazon - Jacquard Potassium Ferricyanide 8Oz
- Oxalic Acid H2C2O4.2H2O
- OPTIONAL - Potassium Dichromate K2Cr2O7(This is a toxic chemical)
Amazon - Potassium Dichromate 1 lb
- Glossy inkjet photopaper or watercolor paper
Amazon - Canson XL Series Watercolor Paper
Amazon - Canon Ink Glossy Photo Paper 4"x 6"
- 200ml Distilled water
Amazon - Pure Life Distilled Water 1 Gallon
- 2x Brown >100ml bottles for light sensitive liquids
Amazon - 4 Pack, 100ml Amber Dropper Bottles with Funnel
- Container for washing the photopaper after developing
- 2x Soft bristle brushes
Amazon - Royal Brush Golden Taklon Paint Brushes
- Latex/nitrile gloves and eye protection


Optional but recommended:
- High accuracy scale
Amazon - GEM20-20g x 0.001 grams, High Precision Digital Milligram Scale
- Syringes
Amazon - 20ml Large Plastic Syringe, Individually Sealed
*As an Amazon Associate I receive a small percentage from sales made through provided links at no cost to you, this helps fund future projects.
Step 2: What Is Cyanotype?
The cyanotype (from Ancient Greek κυάνεος - kuáneos, “dark blue” + τύπος - túpos, “mark, impression, type”) is a slow-reacting, economical photographic printing formulation sensitive to a limited near ultraviolet and blue light spectrum, the range 300 nm to 400 nm known as UVA radiation.
It produces a cyan-blue print used for art as monochrome imagery applicable on a range of supports, and for reprography in the form of blueprints.
For any purpose, the process usually uses two chemicals: ferric ammonium citrate or ferric ammonium oxalate, and potassium ferricyanide, and only water to develop and fix.
Announced in 1842, it is still in use.
Source Wikipedia.org
Step 3: The Camera:
First we are going to need to disassemble our old Brownie for a much deserved clean.
(From my previous Instructable: Kodak Brownie Digital Camera)
Starting with the front panel you simply pull it off like a lid, if your camera has a bit of rust this might make it more difficult but you can use something like the handle of a screwdriver to tap around the edge in order to loosen its grip a bit.
I would advise against the use of any rust lubricants as it might end up damaging the vinyl.
With the front panel off we can remove the shutter mechanism next, you'll notice that there's some small slits on the edges of the shutter plate this corresponds to some protrusions on the camera body. We simply need to pry the shutter away from the camera body in order for it to release and slide out.

Now all the rest of the parts are simply held to the body by bent over tabs, using a small flat screwdriver we can simply bend the tabs straight and the parts will pop out.
Be careful when opening up the tabs not to over bend them as they can break off when bent too many times.

As seen on the picture above the lens assembly is held in place by 3 little dimples that need to be pressed flat in order to disassemble. I used a small sharp punch positioned on top of the bump and pressed it down on a piece of rubber with some force until it was flush.
The lens consists of 5 pieces, the glass lens, two metal retaining rings and two spacers.

With the camera disassembled we need to give it a deep clean!
Usually I like fully restoring antiques but with this camera I feel like all the imperfections tell its story and I want to preserve that.
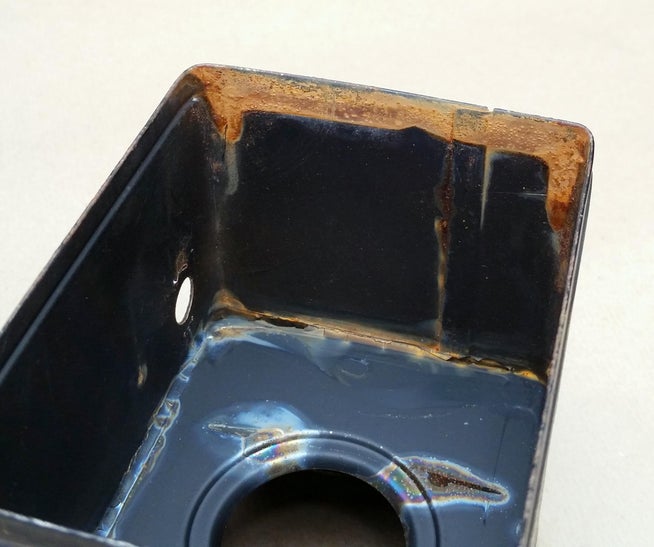
As you can see in the picture above my poor camera was unfortunately exposed to the elements in its life and has gotten some minor rust. By accident I discovered a great way I use to deep clean things like this whist also preserving their beauty.
You will simply need some brushes and rubbing compound, not polishing compound but rubbing compound. What's the difference?, well unlike the white chalky polish this one is a very oily gritty compound.


On the metal parts I used a brass bristle brush in my Dremel along with the rubbing compound on medium speed and a nylon bristle brush on the vinyl with the rubbing compound on a slower speed setting. This lifts away the grime like a dream and retains the antique look on the metal parts.

After cleaning off the leftover rubbing compound from the parts with a damp cloth I used some good old black shoe polish and wiped down the vinyl parts and leather handle.
The glass lenses of the camera is left in some isopropyl alcohol to soften up any build-up before wiping clean with a soft cloth.
Step 4: Cyanotype Mixtures:
This is the recipe I used for this Instructable.
Cyanotype mixtures are very forgiving and can be experimented with to give the results you are after, as you can see in the picture the ferric ammonium citrate I used is the brown variant while this still works perfectly well it does increase the exposure time and leaves a yellow tint behind after developing which I don't mind but ideally you want to look for the "green" variant.
To make 50ml:
Solution A

- Ferric ammonium citrate - 13.5 grams
- Oxalic acid - 0.25 grams
- Distilled water to make 50ml/grams solution

Decant into a clearly labelled light safe bottle to store immediately after mixing.
Solution B:

- Potassium ferricyanide - 4.5 grams
- Oxalic acid - 0.25 grams
- Ammonium dichromate - 0.1 grams (this is a poisonous chemical used as a fixative and is optional)
- Distilled water to make 50ml/grams solution

Decant into a clearly labelled light safe bottle to store immediately after mixing.
The solutions can be stored individually indefinitely in a cool dark place, solution A will naturally grow mold but does not affect it simply filter it off before use.
Step 5: Making Your Film:
At the time of making this project I had no watercolor paper and had to find something that could be submerged in water without damaging and would accept the cyanotype solution, I received this packet of Canon glossy photo paper as a promotion along with the purchase of an ink cartridge and to my surprise it worked out great.
The glossy photopaper has a coating on the printing side that absorbs the ink and instantly dries it, well this works just as well for our cyanotype mixture but it does leave more of a yellow tint to the final picture but I like the result plus images are a lot sharper than with waterpaper.
As cyanotype requires a somewhat high pH level and I didn't know what the coating on the photopaper consisted of I did an experiment with some plain paper and some that I pre-treated in a mild acidic bath first. After developing both I observed no detectable difference so I concluded that at least with this specific paper the coating makes no difference to the cyanotype solution.

When I started I mixed Solution A with Solution B in a 50:50 ratio before coating the paper as most of the instructions tell you to, but lately I started applying just Solution A to the paper before using and then after exposing the film (took a picture) I applied Solution B which instantly reveals your image. I find the solution to be more light sensitive (shorter exposure times) this way than when it's premixed.
Be sure to work in a dimly lit are with the cyanotype solution and always wear gloves and eye protection when working with chemicals.
To prepare your sensitized photopaper you simply need to pour a small amount of Solution A into a container (I get around ten 620 film sized papers out of 2ml of the solution) and then using a soft bristle brush brush the solution onto the paper wiping away any excess with a paper towel to prevent blotches.

Using a sharp hobby knife I cut the sensitized papers into 65mm x 85mm blocks to fit the Kodak Brownie camara and should work with all 620 film cameras.

(In this picture you can already see the Prussian blue forming on the paper from the photo box LED's, which is why it is important to work in a dimly lit room)
Step 6: Experimental: Making Dry Plates
This part is still experimental and not guaranteed to work 100% but is worth trying out because when you are able to make dry plate negatives you can use it for positive exposures and also in darkroom enlargers to make bigger copies of your work.
My first attempt was with the exact solution used above but with gelatine added into the mixture.
I started by adding about 5 grams of gelatine granules to 20 ml of cold water and let it bloom, once the granules are hydrated heat them to about 60 degrees Celsius to dissolve. To make the cyanotype mixture I added about 5ml of both Solution A and Solution B to a container and added 5ml of the dissolved gelatine to the mix and combined well.
You will need to keep this solution warm or it will set up, you can either keep the container in a bowl of hot water or like me keep everything on the heated bed of A 3D printer 🤣.
For the plates I decided to use 2mm polycarbonate instead of more traditional glass plates to keep cost down and to make cutting easier.
I cut a few rectangles the size of the 620 film from the polycarbonate sheet and sanded one face with some 400-600 grit wet sanding paper to help with wetting the plates.

To easily coat the plates use a syringe with the mixture and squirt it slowly across the plate with a container underneath it to catch the excess and set aside to dry.
On my first attempt this method worked perfectly but the next time I placed the plates in a heated enclosure to dry quicker which worked great until I took them out of the heated enclosure and they all flaked off within seconds of cooling.
Next up I'm currently trying out some recipes that use cold glue instead of the gelatine which is showing great results but the glue tends to dry cloudy which isn't ideal.
Step 7: Taking Your First Picture:
Time for the first test run!
Make sure your cameras shutter is set to be continuously open whilst the button is pressed.
Load a sheet of the sensitized paper into the back of your camera and close the door, use the viewfinder to get your subject in frame (the more sunlight the better) press your shutter button and keep it depressed so the shutter stays open, because my Brownie camera is metal I use a magnet to keep the button depressed.

Now this part will take some experimenting, with my setup sunny pictures need an exposure of 30 minutes to an hour for good results this will depend on your solution, lens and UV exposure. The only way to perfect the timing is to experiment even then under and over exposure will still happen now and again but can result in some unexpectedly awesome pictures!

If you mixed Solution A and B together before coating the paper you will seen the results as soon as taking the film from the camera and can move straight to rinsing.

If you only applied Solution A to the paper you will only see a very faint picture, now using a soft bristle brush you can apply a coat of Solution B to the paper this will instantly reveal your photo as you brush it on which BTW is VERY satisfying!

After applying Solution B you can rinse the paper in clean tap water until no more yellow washes off and leave to dry, cyanotype naturally darkens over time as it is exposed to air or you can speed up this process by doing a 1% hydrogen peroxide bath after rinsing it.

Step 8: Negatives to Positives:
By using Kodak's mobile photo scanning app you can easily scan the negative cyanotypes you took into positive digital pictures. Talk about full circle we went from taking a picture with Kodak's earliest camera to making it digital with their mobile app!
Here are two pictures I took and then scanned in using the app, the first photo was under exposed but in the end I really love the moody effect it gave.


Step 9: Updates:
Some updates regarding the project:
- I recently started reading up on cyanotype formulas that use Potassium "Ferro"cyanide instead of the standard Potassium "Ferri"cyanide, this formula seems to be much better suited for photography as it has a MUCH quicker exposure time with better contrast too.
Step 10: Enjoy!
I hope you guys find this Instructable useful and if you have any questions please feel free to leave me a message or comment bellow.
Thank you for taking the time to read through my project and as always..
Happy making!
---

Judges Prize in the
Colors of the Rainbow Contest








5 Comments
7 weeks ago
Well done. I experimented with ready made cyanotype paper a few years ago - cheaper than getting all the chemicals: http://svenhb.bplaced.net/?Bastelkram___Cyanotypie
Scroll a bit down to see my camera, made out of a bellows.
2 months ago
Very cool! I've also experimented with using my old Kodak Brownie as a cyanotype camera, but found much greater success using a homemade box camera (see my recent instructable!) I'm curious to know how the dry plate experiment worked out.
Reply 8 weeks ago
Thank you :)
I'm trying to perfect a solution for the dry plates as the ones online don't work for me but I'll keep you guys updated as I have a few ideas.
Great Instructable BTW! I'm thinking of building my own specifically for cyanotypes with a nice big lens to capture as much light as possible.
8 weeks ago on Step 10
This is great! I've been wanting to try something like this for a while! Do you have an estimate of what the ISO of the cyanotype is?
Reply 8 weeks ago
Thank you! :)
The ISO depends heavily on your own solution, even store bought premade solutions will vary slightly from bottle to bottle. I would recommend looking at Potassium "Ferro"cyanide mixes to get much better light sensitivity.