
Introduction: Java NetBeans Remote Development With Mac and Raspberry Pi 2023

Hello and welcome to this instructables article 'Java NetBeans Remote Development With Mac and Raspberry Pi 2023'.
Before reading this, my apologies for the length of the document, it is a real time account written while trying to make my development system work as the title suggests 'Java NetBeans Remote Development With Mac and Raspberry Pi 2023'
Included are complete and full instructions, suitable for a complete beginner, to take a Raspberry Pi out of its box, load it with Pi OS, install all the required software, set the Raspberry Pi up to use SSH and VNC and finally headless operation.
Plus the complete installation process for NetBeans, its setup for remote debugging, creation of a test Java application and a fix for the compilation and deployment errors that were found along the way.
Background Story
This was undertaken during the initial stages of a long term commercial project that requires a Raspberry Pi as the finished product hardware and Java as the main language in its development, using NetBeans on a MacStudio.
Due to the relatively low power of a Raspberry Pi, from the development point of view, it was determined that an ideal solution would be to use my main development machine (MacStudio) as the power behind the development, with the Raspberry Pi executing the code in its own environment using remote debugging.
I am familiar with NetBeans in the guise of Microchip MPLABX, which is used for embedded PIC development using C language, plus Apache Netbeans for Mac/Linux/win desktop Java applications, it was therefore a simple option to continue with the NetBeans environment.
These are the reasons to use this tool set in my quest for 'Java NetBeans Remote Development With Mac and Raspberry Pi 2023'.
Supplies


- MAIN COMPUTER < in this case a 2022 MacStudio, could be any Mac from the last 12 years
- REMOTE COMPUTER < Pi Raspberry Pi 4, should work with Pi 3 also
- NETWORK CONNECTION < both computers connected by ethernet to a STANDARD WiFi router for IP ADDRESS serving
- INTERNET CONNECTION < this is essential as all software is downloaded at the time instructed
- Mouse Keyboard and Monitor for Raspberry Pi 4, used in SETUP, not required in final use
- SD Card, the fastest you can afford, 32GB minimum recommended
Step 1: Starting the Journey
My first step was started by discovering this 'instructables' article, without which this project may never have started:-
https://www.instructables.com/Efficient-Development-of-Java-for-the-Raspberry-Pi/
After following the instructions some serious issues were found that made the whole process unusable, those issues are not to do with the article at all, rather the passage of time and how current software has changed since the original article was written.
There are numerous articles on the internet describing similar methods for 'Java NetBeans Remote Development With Mac and Raspberry Pi 2023' but there was nothing found that was relative to the current NetBeans and Raspberry Pi nor any article at all that would explain clearly why I was getting the errors seen and then how to fix those errors.
This led to a journey of some weeks research and experimentation before finally having a fully working 'Java NetBeans Remote Development With Mac and Raspberry Pi 2023'
The article here is basically a modern update of the linked article above with complete instructions about every single step along the way.
Step 2: Connecting the Computers Together
My network setup is completely standard with both computers connected to a common cheap WiFi router, which serves IP addresses to both machines, using ethernet cables to both computers.
WiFi was NOT tested, but this should be no problem to use, just maybe not so good for speed or reliability, particularly when debugging using BREAKPOINTS.
The WiFi router is also the source of the internet connection, when connected with ethernet it will give significantly shorter download times during the setting up of software.
Once the system is setup and working there is no need for an internet connection for it to work, this means that its perfectly possible to remove the internet connection to the modem and simply use the modem as a DNS server to link the two computers together.
Step 3: Install Apache NetBeans on the Mac

At the time of writing (September 2023) the current NetBeans IDE is version 19.
I encourage you to download this version and work through this document using this same version as the FIX to the issues encountered are ONLY valid for version 19, it is impossible to say what may change in a future version of NetBeans and how that may effect these details.
It is entirely possible there will be a fix in a newer version of NetBeans.
BUT at the time of writing the supported DEFAULT version of Java in the Raspberry Pi was Java 11, that restricts the whole project to the constraints of REMOTE DEBUG in that version of Java.
This is the link for version 19, which I expect will available for a number of years:-
https://netbeans.apache.org/download/nb19/
Once installed on the Mac we can move to the next step.
Step 4: Create Raspberry Pi OS SD Card

In order to remove all possibility that an error in the Raspberry Pi OS has been introduced during previous use it is sensible to start this project with a completely new and basic Pi OS installation.
This is nowadays an extremely simple and quick process which is achieved using a very functional application downloaded from the official Raspberry Pi web site, which has the most recent versions of Pi OS.
As far as I know the actual version or 32/64 bit type of Pi OS will have no influence on the project here as it relies on the Java JDK, which is agnostic as to platform and 32/64 bit hardware.
I have tested this process on both 32 and 64 bit versions of Pi OS just to be sure and, they both worked exactly the same in the final testing.
My preference is to use 64 bit as it appears to run faster in my system tests than the 32 bit version.
- Visit https://www.raspberrypi.com/software/ and download 'Raspberry Pi Imager' for macOS
- Connect your SD card to the Mac, IT WILL BE ERASED SO BE SURE ITS NOT USEFULL
- On the Mac launch 'Raspberry Pi Imager'
- Click 'CHOOSE OS', in the window select 'Raspberry Pi OS(other)'
- Click 'Raspberry Pi OS(64-bit)', it will be downloaded and cached on your Mac
- Once finished, click 'CHOOSE STORAGE', select the SD card to use (be sure its the correct one)
- Click 'WRITE' to begin, confirm the SD card erase, followed by entering the Mac login password
- When finished you get a message 'Write Successful' and 'Safe to remove SD Card' (or similar)
Now connect the mouse, keyboard, monitor and ethernet connectors to the Pi computer and insert the SD card into its connector, DO NOT POWER UP YET.
Before applying power obviously check there is nothing that can short out the PCB on the Pi, if like me it is just a bare board without a case.
Secondly be absolutely sure the power supply is able to actually run the Pi you are using, otherwise its possible it will fail to boot up and may corrupt the SD card.
Power the Pi, it will go through some initial set up procedures and auto reboot at some point, eventually you will be presented with a prompt window asking for basic information such as country of use, language etc.
At some point you are asked to enter USER NAME and PASSWORD, MAKE SURE YOU RECORD THEM, the whole system relies on these credentials for SSH, VNC and REMOTE DEBUG connection later in the project.
Finally you will get to the point where updates are checked for, make sure you say yes to this.
Downloading automatically starts and (eventually) this will result in a reboot to update everything.
One last thing..... this is a good point to also record the IP ADDRESS that your Raspberry Pi is using on the network.
The Pi Desktop, by default, has a network connection icon in the 'Application Bar', it can be either the standard 'WiFi' shaped triangular lines or two small blue up and down arrows if using ethernet (which is not very intuitive to me!).
Whatever is showing, just hover the mouse over this icon, after a short pause a popup appears which has two lines in it:-
eth0: 'Configured xxx.xxx.xxx.xxx' or 'Not associated'
wlan0: 'Configured xxx.xxx.xxx.xxx' or 'Not associated'
If ONLY ethernet is connected record the IP ADDRESS in 'eth0'
If WiFi is connected IT TAKES PRIORITY, regardless of ethernet connection, so record the WiFi IP ADDRESS.
You now have USER NAME, PASSWORD and IP ADDRESS which, as previously mentioned, are required for SSH, VNC and REMOTE DEBUG.
That concludes the installation of a brand new Pi OS on the Raspberry.
Step 5: NetBeans Java 11 Install and JDK Setup

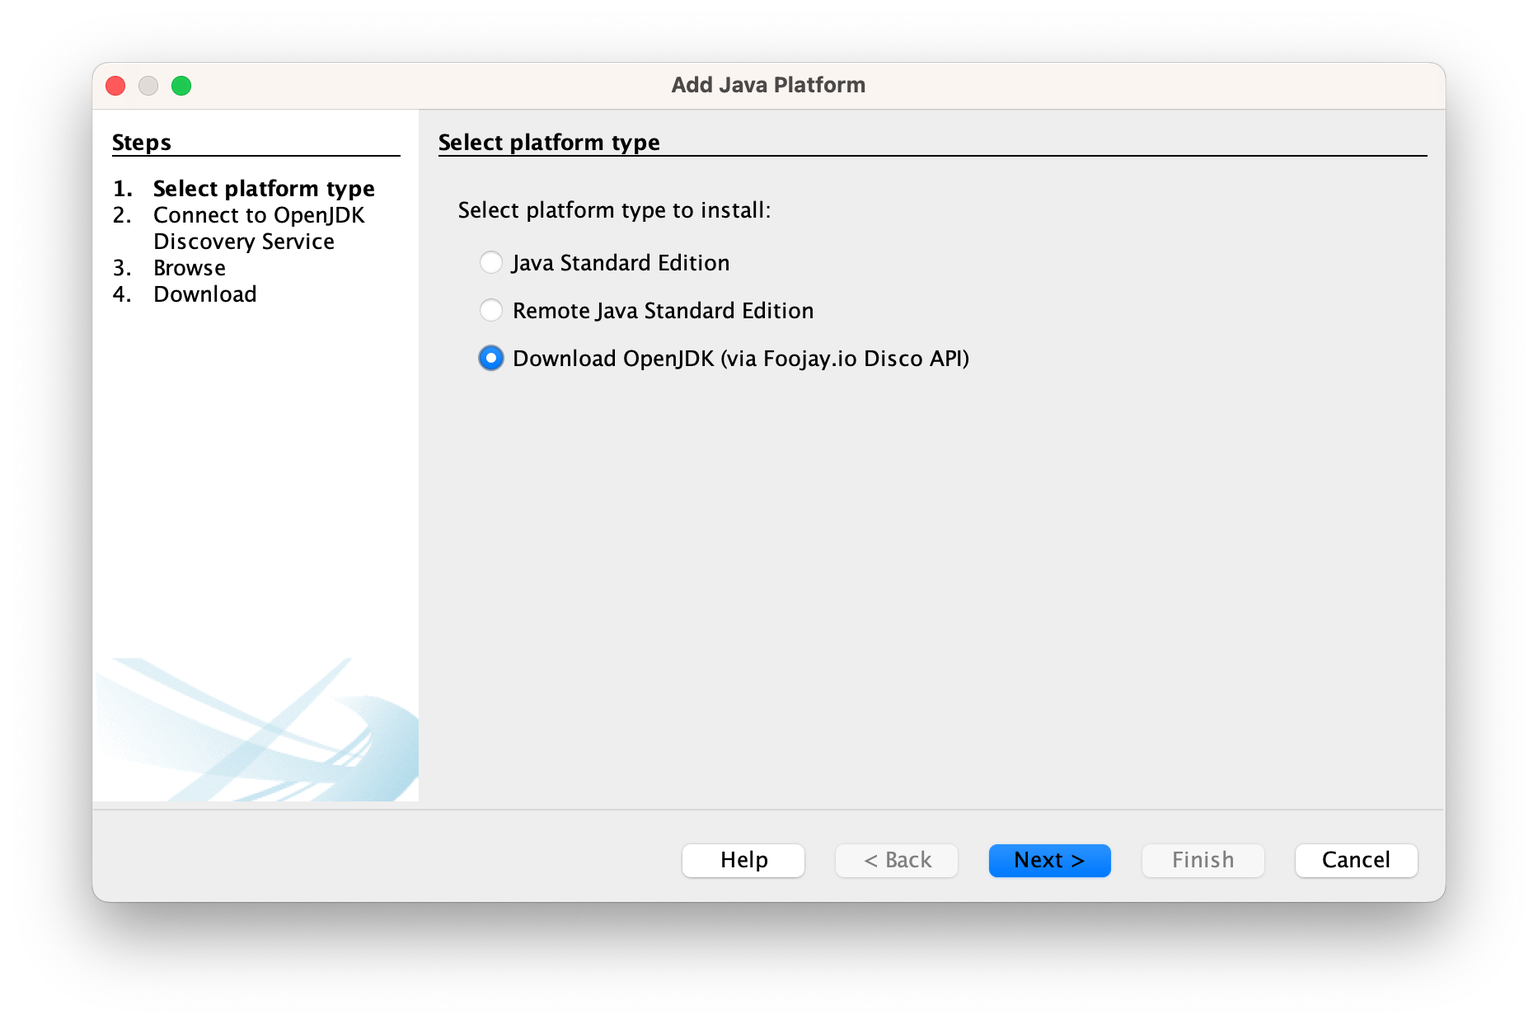

This step describes the process in NetBeans 19 to download Java 11 and add it to the available JDK usable for development, then FORCE NetBeans to use JDK 11 as its DEFAULT JDK, rather than Java 17 which is downloaded when you install NetBeans 19.
The pictures above show how these steps appear on my computer.
- Open NetBeans on the Mac, navigate the toolbar to NETBEANS>TOOLS>JAVA PLATFORMS
- 'Java Platform Manager' opens, click 'Add Platform' button, 'Add Java Platform' window opens
- Click 'Download OpenJDK (via Foojay.io Disco API)', click NEXT button
- The window changes to 'Connect to OpenJDK Discovery Service' with a slider to select a JDK
- Move the slider to '11(LTS)', an online search looks for the JDK, when found it is placed next to 'Package' label
- Click NEXT button, this moves to a 'Downloading' window, after downloading the JDK is installed
The packaged used in my case was 'zulu11.66.19-ca-jdk11.0.20.1-macosx_aarch64.zip' because I am on an ARM Mac, it may well be something different for you depending on your Mac type.
Next we need to tell the IDE that the whole process needs to ONLY use JDK 11.
This is done with NETBEANS>SETTINGS menu, this opens 'Options' window.
- Click 'Java' in the menu bar
- Click 'Java Shell', in 'Java Platform' select 'JDK 11', in 'Engine' select 'Nashorn', click APPLY
- Click 'JS on JVM', in 'Java Platform' select 'JDK 11', click APPLY
- Click OK to exit
As part of this project there were times where it seemed that it was impossible for some results of tests to be valid, this was particularly the case when occasionally the RUN or REMOTE DEBUG would stop working.
This was found initially to be due to restarting NetBeans and changes made were being lost, that was sorted out but still a problem existed which seemed not to have any explanation, that explanation lead to the HACK described next.
The final reason for this strange problem appeared to be that when the JAVA 11 JDK was specified in NETBEANS>SETTINGS it was sometimes being overwritten by some internal script that was pointing to <JAVA DEFAULT> (Java 17) rather than Java 11 selected earlier.
After looking at all the different solutions on the internet showing how to ensure the DEFAULT JAVA VERSION was used, it seemed that there were too many different ways, depending upon the macOS version, how and when any other version of Java had been installed in the past..... blah blah blah, very unhelpful.
Eventually only one way was found to be sure that any user of any macOS trying to use this project would be guaranteed to make it work, and it is a horrible HACKITY HACKY HACK.
Also this HACK will be lost (for obvious reasons) if the NetBeans version is ever updated, it would need repeating in that case.
The HACK:-
I found an article somewhere (sorry but I cant reference it here as I do not remember the web site) that described swapping between Java versions on the same machine, without removing the other versions from their downloaded location.
That article is the basis for the HACK I describe now, MAKE SURE YOU CLOSE NETBEANS NOW.
Find the location of your Java 11 JDK installation, this may not be the same on all macOS versions, but I will give my location as an example:-
/Users/YOUR_USER_NAME/NetBeansJDKs/zulu11.66.19-ca-jdk11.0.20.1-macosx_aarch64
You MUST use this full path to the location in this HACK.
- Find the Apache NetBeans application installation location
- Two finger tap (right click) on the NetBeans app icon, click 'Open Package Contents'
- Navigate to RESOURCES>ETC, there are 3 files, the one we want is 'netbeans.conf', edit is not allowed here
- First copy the file and paste the copy somewhere you have permission to edit, desktop is a good place
- Rename the original file to 'netbeans1.conf' to preserve it, rename is allowed in this case(with password)
- Open the copy with TextEdit, scroll down to the bottom and look for #netbeans_jdkhome="/path/to/jdk"
- IMMEDIATELY under this a new line is added:- netbeans_jdkhome="/Users/YOUR_USER_NAME/NetBeansJDKs/zulu11.66.19-ca-jdk11.0.20.1-macosx_aarch64" (obviously use your own path here)
- Save the file and copy it, go to the original file location and paste it (password required)
Now start NetBeans and navigate NETBEANS>TOOLS>JAVA PLATFORMS, this opens 'Java Platform Manager', look at 'Platforms' 'Java SE' and look at JDK 11, if it has (Default) next to it, as shown in the photos above, then this HACK has worked.
Step 6: Raspberry Pi Java 11 Install
A fresh download of Pi OS will not have a Java JDK installed, but just to be sure we check this by using the Pi TERMINAL and a COMMAND.
Open a TERMINAL and enter the following at the prompt:-
java -version
Press enter and you should see a message 'command not found' or similar, which means no Java is installed.
If there is a version, and it is NOT JDK 11, remove it (you will have to search about how to do this).
Next in terminal type these commands:-
sudo apt update
This loads the current contents of the 'repository' into the Pi local database so any following commands are up to date.
Followed by:-
sudo apt install default-jdk
This command should download (at the time of writing) Java JDK 11 because it is the current 'default' JDK in the repository.
After it is finished and the command prompt returns, we need to REBOOT the Pi.
When the desktop returns open a TERMINAL and test again the version, type:-
java -version
The return message should be something like this:-
'openjdk version "11.0.20" 2023-07-18', there will be other lines too just confirming the runtime and server versions.
IF THIS IS NOT JDK 11 then you must remove it and research how to download JDK 11 separately, this project is ONLY tested with JDK 11 so that must be tried first, when the project is fully functioning different versions could be tested.
This is the end of this step!
Step 7: Testing Mac and Pi Network Using SSH


This step will determine if any other part of the project is able to function by creating an SSH connection between the Mac and the Pi using the Mac to operate the Pi TERMINAL on the Mac screen.
The first step is to go to the Pi:-
- APPLICATION MENU>PREFERENCES>RASPBERRY PI CONFIGURATION
- In the window click 'Interfaces' TAB, a list of options is shown along with a confusing 'button' icon (see picture above)
- Click the SSH button icon until it goes dark and the round element is on the right (used now)
- Click the VNC button icon until it goes dark and the round element is on the right (used later)
- Click OK button
This sets up the Pi to support both SSH and VNC secure connections over a network using USER NAME, PASSWORD and IP ADDRESS, as previously recorded.
Next we need to move over to the Mac computer and open up TERMINAL on it.
In the new TERMINAL we must use the command 'ssh' which will generate the secure connection tunnel over the network using USER NAME, PASSWORD and target the IP ADDRESS of the Pi.
Obviously DO NOT just type what I am showing here as the COMMAND, this is a generic note, where you replace the placeholders with your own USER NAME, PASSWORD and IP ADDRESS.
In the TERMINAL type (the picture above shows this whole process):-
ssh 'IP ADDRESS OF RASPBERRY PI' -l 'USER NAME'
As an example of what i have:-
ssh 192.168.0.110 -l myRemote Pi
Unless this is EXACTLY correct it will not work.
Providing you pass this step, the TERMINAL in the Mac will now show 'xxx@xxx.xxx.xxx.xxx's password:' which is expecting you to enter the PASSWORD you created when you INSTALLED Pi OS.
Enter this password, you will not see any key you typed, this is 'normal' linux behaviour, press ENTER.
If correct you will see a message printed with several lines of information and, the important point, a change in the PROMPT from:-
xxx@yyy ~ % (your Mac user name and computer name) to:-
xxx@raspberrypi:~ $
That is the standard COMMAND LINE PROMPT in the Pi as if you were sat at the Pi monitor using the mouse and keyboard directly connected, you now have full control of the remote Pi from the Mac desktop.
We now need to test this connection to be sure everything is as expected.
At this new prompt on the Mac type:-
sudo apt update
The terminal will now command the Pi to log into the internet and download the latest repository information and download it to the RASPBERRY in exactly the same way as it would if you did the same command at the Pi keyboard.
Providing all this happened you have proved the SSH connection ability between Pi and Mac computer.
Step 8: Create Java Test App for Remote Debug

This step will create a very simple Java application that has just enough included to check that any Java desktop app you will ever need to deploy can run in the REMOTE DEBUG environment.
The app is a Java ANT application which has a window, a button and a textarea.
Go to NETBEANS>FILE>NEW PROJECT, the 'New Project' window opens:-
- In 'Categories' click 'Java with Ant', in 'Projects' click 'Java Application', click NEXT
- 'New Java Application' window opens, in 'Project Name' type 'PiTest', click FINISH, the new project opens in the IDE
- Two finger tap (right click) on 'Source Packages>PiTest', select 'New>JFrame Form', name it 'PiRemoteWin', press FINISH, a new file is created which has the project user window in it
- Now DELETE the 'PiTest' file, this is because both these files have a MAIN function and we only need one
- Next press the DEBUG PROJECT button, a window appears telling you that there is no MAIN class and do you want to use the one it selected in the window, press OK, the code will run and show an EMPTY window on the Mac screen as expected, press STOP to end DEBUG
- The file 'PiRemoteWin.java' will be open in the IDE, select 'Design' and add a 'Button' and a 'TextField' to the window, there is no need to change the names of the controls for this test
- Select the 'Button' on the window, in its 'Properties' window select 'Events', in the dropdown selection for 'actionPerformed' select 'jButton1ActionPerformed', this will immediately swap the form to its 'Source' view and add new EVENT code that will act whenever the button is pressed
- In 'jButtonActionPerformed(java.awt.event.ActionEvent evt)' function, directly underneath '//TODO...' place this code:- jTextField1.setText("Pressed!");
- Press the DEBUG PROJECT icon, the window appears on the Mac screen with the button and the textfield, press the button and the text appears in the textfield, this concludes the test of the test application
This small project is all that is needed to fully test the REMOTE DEBUG later in this project.
Step 9: Create NetBeans Debug Profile

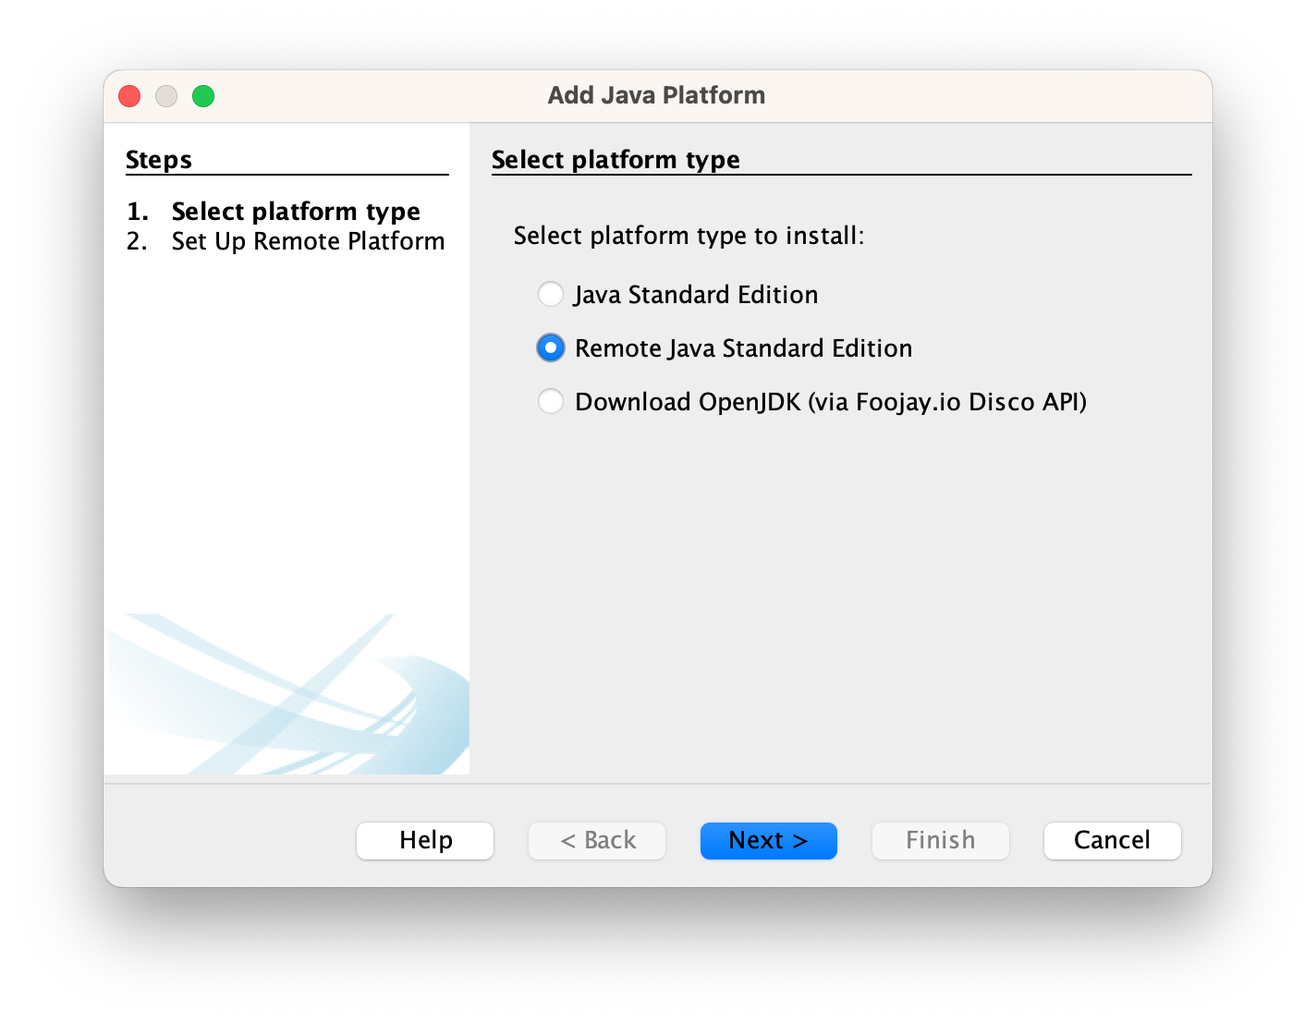

In order to run a REMOTE DEBUG session we need to create a new NetBeans 'Platform' in the IDE which has all the credentials of the REMOTE COMPUTER and the paths used to store the Java JDK and project code.
- Go to the toolbar NETBEANS>TOOLS>JAVA PLATFORMS, 'Java Platform Manager' window opens
- Click 'Add Platform', click 'Remote Java Standard Edition', click NEXT, 'Add Java Platform' window opens
- In 'Platform Name' type 'PiRemoteDev_J11' which explains it is 'Pi REMOTE DEVELOPMENT using JAVA 11'
- 'Host', this is the IP ADDRESS of the Raspberry Pi discovered earlier
- 'Username', this is USERNAME created when installing Pi OS
- 'Password', this is the PASSWORD created when installing Pi OS
- 'Remote JRE Path', this needs a bit of work to find, on the Pi open a TERMINAL window (or use SSH on the MAIN MACHINE) and type the following:-
- sudo update-alternatives --display java
- The return will show several lines of data, we want 'link currently points to /usr/lib....'
- copy the part that looks like this 'usr/lib/jvm/java-11-openjdk-arm64', do not copy the '/bin/java' part of the path as that will cause the path to fail
- Paste this main part into the 'Remote JRE Path' field, press NEXT, this will then test the path, if all is ok it will report that the connection was good and is available for use
- The new platform 'PiRemoteDev_11' will appear in the 'Java Platform Manager' window under 'Platforms>Remote Java SE'
Step 10: Add the Remote Java Platform to the PiTest Java App
Now we have a REMOTE DEBUG platform we can add it to the previously created 'PiTest' app.
- In NetBeans click 'Projects' tab, then highlight (by clicking on it) the 'PiTest' project header
- Two finger tap (right click) on the highlighted 'PiTest' project, this opens a large menu, go to the bottom and select 'Properties', unsurprisingly this opens a window called 'Project Properties - PiTest'
- Select 'Categories>Libraries', in 'Java Platform' select 'JDK 11' (or similar)
- Select 'Categories>Run', in 'Configuration' press 'New', in the window that opens type 'PiRemote', this can actually be any name at all, it is there to differentiate it from '<default config>' which can not be used for remote operation
- In this same window, 'Categories>Run', click the combobox 'Runtime Platform' and select 'PiRemoteDev_J11', click OK to finish and exit this step
In theory this should be the end of the process as the system (according to web site linked at the top of the page) is complete and pressing the RUN or DEBUG button in NetBeans should download the project code to the Pi and execute it on the Pi desktop, either running the program using the project code or allowing full remote DEBUG with BREAKPOINTS and VARIABLE VIEWING as one would expect in the MAIN COMPUTER.
Step 11: Testing Remote Run and Debug
In theory the steps above should be all that is required to REMOTE RUN and DEBUG, sadly in my system this is not the case.
Testing the system means we need the Raspberry Pi connected to the same network as the MAIN COMPUTER, the Pi to have the correct USER NAME, PASSWORD and IP ADDRESS as those added to the 'PiRemoteDev_J11' platform profile, if you are following this project all the way in one go then you are already connected and ready to go.
If you change the Raspberry Pi, connect it to a different ethernet port or test it with WiFi, you will need to edit or create a new 'NetBeans Debug Profile', as described above.
Once connected correctly all that is required now is to press the PLAY button in the NetBeans toolbar.
The IDE has its progress shown in the 'Output' window (NETBEANS>WINDOW>OUTPUT) which will run through the compilation and remote command process sent to the REMOTE COMPUTER.
In my system this fails with an error:-
Exception in thread "AWT-EventQueue-0"
java.awt.HeadlessException:
No X11 DISPLAY variable was set, but this program performed an operation which requires it.
At the time I had no idea what this useless error message was and even less idea on how to fix it.
Following days of research and head scratching it seemed like the error was due to the Java application not knowing which display to target its application window at, I still did not know how to get that information passed from Pi to NetBeans.
I assumed it was a requirement that was to be set somewhere in the Raspberry Pi, as it was the source of the required display information and, it needed a setting somewhere that would automatically transfer this information to NetBeans.
That proved to be wrong in the fix to the issue.
In this research it became apparent that somewhere in the process the command 'export DISPLAY=:0' was required for NetBeans to correctly address the X11 desktop used in Pi.
This eventually ended up with me copying the command generated in NetBeans (shown in the 'Output' window) into the SSH TERMINAL connected to the Pi, then remotely executing it from the Mac.
That same TERMINAL COMMAND resulted in exactly the same errors being printed in the terminal window, proving it was an issue with the command being sent.
The next step was to put in the terminal the command 'export DISPLAY=:0' the press enter.
As a separate entry I pasted the rest of the command created by NetBeans (in the 'Output' window) and pressed enter.
WOWOOOOOOO!, it worked, the test app window appeared on the Raspberry Pi desktop and when the button was pressed it placed its text in the textarea, so now I had to figure out how to get that extra command into NetBeans.
Next is the FIX for this problem.
Step 12: Fix for 'export DISPLAY=:0'
After much trying it was found there was absolutely no place that NetBeans has to prepend the COMMAND generated by the IDE in order to get the DISPLAY reference before deployment.
It was obvious that somewhere in NetBeans there was internal code generating the TERMINAL COMMAND being shown in the 'Output' window.
After trying many search terms, using different parts of the output window, it was found that searching with 'profile-rp-calibrate-passwd' showed a link in a single file called 'remote-platform-impl.xml', this proved to be the needle in the haystack and eventually leads to the FIX to make the whole thing work.
'remote-platform-impl.xml' is an XML file generated by the IDE when it opens up and it is used to create the TERMINAL COMMAND which is sent to the remote computer in order to start the application or debug it.
I have not used XML in any form previously so I did not know much of what was going on, but as it was a quite simple process some things became obvious.
Looking at the XML file, just below the line with 'profile-rp-calibrate-passwd', there is a line with 'command="cd ......' which seemed to have all the elements that were in the 'Output' window COMMAND being sent to the Pi.
After much messing about I eventually came up with a command structure that worked as expected:-
command="export DISPLAY=:0; cd '${remote.project.dir}'; ${remote.platform.exec.prefix}'${remote.java.executable}' @{additionaljvmargs} -Dfile.encoding=${runtime.encoding} ${run.jvmargs} ${run.jvmargs.ide} -jar ${remote.dist.jar} ${application.args}"/>
This only differs from the original by adding 'export DISPLAY=:0; ' before the 'cd....' part of the command, notice the separation of the 'DISPLAY' and 'cd' with a ';' character which seems to send the commands as separate lines so they are not rejected by the TERMINAL.
Now press PLAY and the 'PiTest' window appears on the remote Pi desktop!
That is half the FIX done, this DOES NOT allow REMOTE DEBUG to work, but does make fixing that issue much easier.
THERE IS HOWEVER A CAVEAT:-
When you restart NetBeans this modification WILL NOT REMAIN and you must replace this line again.
Also any new project created will have its own copy of the original 'remote-platform-impl.xml' which will not have this FIX in it so you will have to add it again.
Step 13: Fix for Remote Debug Errors
In this final step the REMOTE DEBUG errors are fixed and the whole project will be functioning as expected.
With all the system set up as in the previous steps it should be simple enough to create the final problems, just press the DEBUG PROJECT icon in the main NetBeans toolbar.
This resulted in the following error messages in the 'Output' window:-
Property "debug-args-line" has not been set
Connecting to 192.168.0.110:22
cmd : export DISPLAY=:0; cd '/home/doj/NetBeansProjects//PiTest'; '/usr/lib/jvm/java-11-openjdk-arm64/bin/java' ${debug-args-line} -Xrunjdwp:transport=dt_socket,address=localhost:57977 -Dfile.encoding=UTF-8 -jar /home/doj/NetBeansProjects//PiTest/dist/PiTest.jar
Error: Could not find or load main class args-line
Caused by: java.lang.ClassNotFoundException: args-line
/Volumes/Work/Java/Projects/PiTest/nbproject/remote-platform-impl.xml:133: The following error occurred while executing this line:
/Volumes/Work/Java/Projects/PiTest/nbproject/remote-platform-impl.xml:83: Remote command failed with exit status 1
First of all have a look at the top line of this error, you will see that the first COMMAND is the one added previously:-
' export DISPLAY=:0; '
That shows the COMMAND being generated to run REMOTE DEBUG is generated in the same XML file and the issue is either in this command or how it is being interpreted in the Raspberry Pi.
As I have no idea where there could possibly be an issue with the Pi, I gallantly ignored that and continued to look at this COMMAND below.
There was one odd part to it:-
${debug-args-line}
This seemed completely out of place in a TERMINAL COMMAND and was more like the code in the XML file.
It seems like a PLACEHOLDER that is supposed to be replaced in the XML file with something else from an IDE option.
I searched for this PLACEHOLDER and it was indeed part of a different line of code in the same XML file, just a few lines away (at LINE 133):-
<remote:runwithpasswd additionaljvmargs="${debug-args-line} -Xrunjdwp:transport=${debug-transport},address=${jpda.address}"/>
This line is added to the other generated COMMAND (the one with DISPLAY in it) before being sent to the REMOTE COMPUTER.
I searched about the internet for one of the phrases in this obviously faulty code and this one:-
'Xrunjdwp'
Produces several links that show what a correct COMMAND using this function should look like, it was this:-
'-Xdebug -Xrunjdwp......'
It seemed obvious to me that for whatever reason the current NetBeans IDE is not able to fill in this PLACEHOLDER correctly and no one else seems to have noticed!
I replaced the '${debug-args-line}' with '-Xdebug' to get this COMMAND:-
"-Xdebug -Xrunjdwp:transport=${debug-transport},address=${jpda.address}"/>
Now press DEBUG PROJECT icon and guess what, YAYYYYYYY!!!!!!! it puts the 'PiTest' project onto the REMOTE COMPUTER desktop and functions as expected.
PLEASE REMEMBER that whenever NetBeans is restarted or a new project created these HACKS will need to be done all over again as they are not save by the IDE when it closes down.
Step 14: Final Test of the Debugger Using a Breakpoint


Following on from the success of the REMOTE DEBUG deployment we can now show how to deploy the NetBeans DEBUGGER using the 'PiTest' project created previously.
- Press DEBUG PROJECT icon in NetBeans toolbar, wait for the 'PiTest' window to appear on the Raspberry Pi
- In the NetBeans EDITOR, ensure the 'PiTest' project FILE 'PiRemoteWin.java' is in the IDE editing window
- At LINE 72 you should have the FUNCTION 'private void jButton1ActionPerformed(java.awt.event.ActionEvent evt)'
- At LINE 75 you should have 'jTextField1.setText("Pressed!");', this is what is printed after the button press
You have now located the place in code we are going to actually place a BREAKPOINT.
Click the mouse pointer just to the left of the LINE NUMBER (or you may have a little yellow round icon there instead, which you can ignore), this needs to create a small RED square with a BLACK arrow next to it, the whole line also turns RED to indicate this has happened (see picture above).
This is a BREAKPOINT which will, if everything is working properly, STOP THE CODE EXECUTION at that point WHEN YOU PRESS THE BUTTON ON THE Pi TEST PROJECT WINDOW.
This will also allow the variables in the project to be inspected.
Now go to the REMOTE COMPUTER, on the test project window PRESS THE BUTTON, while observing the RED BREAKPOINT LINE.
If all went well NetBeans will HALT the code at your BREAKPOINT and turn the RED LINE to a GREEN LINE (see picture above).
This indicates your code has stopped executing at that point, allowing you to inspect all the VARIABLES in the paused REMOTE COMPUTER code.
In the NetBeans 'Variables' window any inspectable variables are shown, you can look at them to see what they are at this precise moment.
Obviously, in this super simple app there is almost nothing of interest there, but when your real project is running there will be a lot of data in this window.
Step 15: Going Headless!, Pi With VNC


This part is for me the most useful with respect to being productive and not having my work space FULL of monitors.
Now we have a totally functioning DEBUG system we can introduce one more REMOTE function and that is VNC.
VNC will allow the Pi to be controlled TOTALLY by the main computer, which means you do not need to have the mouse, keyboard or monitor plugged into the Raspberry Pi at all, for me this saves a huge amount of space, adds a lot of convenience and is very easy to set up.
Raspberry Pi
This setup up is very simple:-
- In the Application Menu click on 'Preferences', and then:-
- Click 'Raspberry Pi Configuration', this opens a new window 'Raspberry Pi Configuration'
- Click the TAB 'Display', click the 'Headless Resolution' combobox, it shows available screen resolution
- Select the screen pixel size you wish to use on the MAIN COMPUTER (see picture above)
- Click 'Interfaces' TAB' and be sure that the VNC selection is on and, the same as SSH
- Click OK to finish the setup
That is it, take a look at the application menu bar, at the right hand side you should have a new icon for RealVNC (see picture above) which proves the new settings worked and the Pi is now able to be connected by VNC for remote headless operation.
A note regarding the 'Headless Resolution', should you decide to keep a monitor connected to the Pi then this value is ignored because the Pi is using the native resolution of the connected monitor, this may cause issues if you have a monitor connected that exceeds the MAXIMUM headless resolution of 1920x1080 pixels.
Unless necessary, for this sort of remote debug, I would recommend removing the monitor.
Main Computer
This describes the easiest method of VNC connection from the Mac to the Pi because it uses the VNC app from RealVNC that is included in the Pi OS download, although a commercial product, they allow free use for non commercial operation, in such cases as this remote desktop sharing, you do not require a licence key for this projects use.
Go to this site to download RealVNC for Mac:-
https://www.realvnc.com/en/connect/download/combined/
You will get asked several times if you want to get a licence, just ignore that, you really don't need one unless you chose to do so.
Once installed open the app up and you are presented with a window that has an ADDRESS BAR at the top of it, type the Pi IP ADDRESS you use for the REMOTE DEBUG and press ENTER.
A new window opens asking for the LOGIN details for the Pi REMOTE COMPUTER, the USERNAME and PASSWORD created when Pi OS was installed.
Now the magic happens, click OK.
A new DESKTOP window will appear on your Mac, it will either be the MONITOR size or the HEADLESS size if the monitor is not connected.
You can now control the Pi using the keyboard and mouse you use normally on your MAIN MACHINE and treat the Raspberry Pi window as if it were just part of the MAIN MACHINE, the mouse and keyboard connected to the Pi can also be removed.
Step 16: Fixing Headless Slow Screen Updating


Headless Pi Screen Performance
After a short time it became obvious (usually only when using the Pi Web Browser) that the speed of the screen refresh was completely unusable, for web browser use at least.
If an external monitor was plugged in while the VNC remote screen was being used, on the MAIN COMPUTER it was great, just like the monitor its self, but when the monitor was removed the speed was terrible, for web browsing specifically.
Research suggested that this was due to FRAME BUFFER not being used to paint the screen BEFORE it was transferred to the VNC screen for viewing.
A simple fix was found which required the Pi OS '/boot/config.txt' to be modified by adding a few lines of code that force the Pi to think it has a physical monitor attached and, that it should use a specific FRAME BUFFER size.
A point to note, you MUST set the 'framebuffer_width' and 'framebuffer_height' values to THE SAME AS THE HEADLESS DISPLAY SIZE set in 'Raspberry Pi Configuration'.
- Close the Pi down and put the SD card in the main computer (you cant edit it on the Pi).
- Navigate to 'bootfs' drive in Finder (picture above)
- Open 'config.txt' in TextEdit
- Copy this code (MUST make width and height the same as your Pi HEADLESS size):-
framebuffer_width=1920
framebuffer_height=1080
hdmi_force_hotplug=1
hdmi_group=1
hdmi_mode=16
hdmi_drive=2
- Paste the code immediately below the line '# Some settings may impact device functionality. See link above for details'
- Check it looks like the picture above, its position in the file is not too important, save and close the file
- Unmount the SD card and place back in the Pi
- Disconnect the monitor connected to the Pi
- Power up the Pi making sure your VPN connection has been started on the MAIN COMPUTER
- As soon as the Pi is back up and running the screen should show in the VPN window
At this point it will be unlikely that anything noticeable has changed therefore we need to test the new configuration.
Open the Web Browser on the Pi, in the address bar just type 'raspberry pi'.
If you find as you are typing you are getting suggestions show up and that the characters you are typing appear at the same speed you type them, then it looks like it has worked, the top hit should be 'Raspberry Pi', click it, if the web site loads in a couple of seconds then its definitely working.
Without this change the web browser is completely useless and it is almost impossible to type even a single character into the address bar.
Step 17: Enjoy and Goodbye!

That is it, here is a picture of my NetBeans IDE and the Raspberry Pi connected by VNC showing the 'PiTest' application on the Pi and the BREAKPOINT in the NetBeans IDE.
The project is now complete and I hope this can help anyone get REMOTE DEBUGGING for high productivity working on their own system.
Any comments on how some of the steps may be improved, or if anyone has greater knowledge about why the COMMAND values are not set correctly, I would be very pleased to hear about it.
73 de EA5IYK

This is an entry in the
First Time Author


Comments