
Introduction: Pathalogic 2 Executor's Mask


So as I have spent more time at home recently I got really bored and stumbled down a rabbit hole of video essays for this game called Pathalogic. The second I heard of it I was obsessed and felt I had to honor it in some way. So the best way I could think of doing that was to recreate the mask the Executors wear in the game, the mask the Executors wear are based of of masks worn during a stage play I figured it would be possible to recreate one myself. So once I had my idea I was sent to work in a process I will detail below, however before we start you are going to need some supplies like...
Supplies
1.) Blender (The computer program)
2.) Pepakura designer (There's a free version, the paid one just allows you to export but you won't need that)
3.) Paper
4.) Printer
5.) Scissors
6.) Tape
7.) Glue (Craft, Elmers, and Hot)
8.) Clay
9.) Gap filler
10.) Acrylic paints (Browns and blacks)
11.) A see through Mesh
Step 1: Prepping the Base


The base of the clay mask will be made with a bit of an advanced technique. We will be making a paper model with a computer program to build upon with clay. To start we are going to want to source a 3d model to build upon. You can start by going to https://pinshape.com/items/103432-3d-printed-execu... and downloading the head model from there, This will give us the 3D model we can later turn into a paper sculpture.
However before we can finish this step you will need to import your model into blender, to do so go to File -> Import -> (.stl) then select the Executors mask file. This will be an important part so pay attention to the next step.
Step 2: Lowering the Polygon Count


Blender may seem intimidating but we don't have to do much here and the little we have to do is very simple. So to start select your model by left clicking it. Once it is selected you'll notice an orange highlight around the model, this means it has been selected. Once selected we want to go to the blue wrench on the right of the screen. This will allow us to add a modifier. Once the blue wrench has been clicked we can add a modifier, go over to add modifier and click decimate. This will allow us to simplify the model so we don't need to do as much work later. Once decimate is selected we want to click on ratio and lower that to around 0.0113, this will make the model very simple, making it easier for when we make it out of paper. Once your model is simplified we can export it out of blender by going File -> Export -> (.stl) then you can save it to your desktop for the next step.
Step 3: The Basics of Pepakura


Open up Pepakura designer so we can get started with turning a 3D model into a paper model you can print with your printer. Firstly when Pepakura designer is opened we want to go to File -> Open then select our low-poly model of our mask. Once completed you will notice Pepakura asks what is the orientation of everything. You want to set the direction the beak points in as the front and the base as the bottom. This orientation helps everything in the long run. Final step is Pepakura will ask for the scale of the model I set the size to be 10.34 x 5 x 10.99 but I recommend you scale your up so it will fit your face better.
Once our model is fully imported we are going to want to click unfold at the top of the page, this will unfold the model so we can make a simplified paper version. However at the moment it is a little complicated so we want to simplify that. Start by going to the top left corner and click on the icon with the boxes and arrows (Pictured in the second image). This tools lets us split large chunks of the model into smaller parts so we have less complicated parts to deal with when it comes to assembly. The way it works is when you hover over a line on the unfolded parts on the right you will see either a red or green line, clicking on this line splits the model into 2 parts you can use this to make complex parts easier or large chunks into easier to print pieces.
Once you have split your unfolded pieces into more manageable parts you can arrange them on the grid. Each grid represents 1 sheet of A4 paper I recommend cramming everything onto as few sheets as possible to prevent waste. Once you got everything organised you want to make sure you go to 2D menu -> Edge ID this will allow numbers to appear on the edges making it easier to connect the pieces. This step is very important or else you'll have a tough time with assembly. But once that's finished we can print that out and get moving onto the next step.
Step 4: Print, Cut, and Snip


Once all of your parts are printed out we can get started with the actual crafting part. Assembly is pretty easy but here is what I recommend, cut all your out pieces first it makes assembly much easier in the long run. Once everything is cut you should also do all the folding before assembly. On regular dotted lines you want to fold inwards, and on lines that have a dash and a dot you want to fold outward. This helps in getting the shape we want later on. Once everything is cut and folded then you can just start taping it all together. Keep in mind if you still have Pepakura open you can actually click on a piece to see how it fits in with everything. But you should be just fine with taping each set of numbers together. And once finished you should have a paper model of the mask. (I swear this is all gonna tie in to making the final mask)
Step 5: Check Your Mask Fits


Around this time you want to ensure your mask fits. I wanted my mask to cover my eyes and nose I didn't want my mouth covered because I thought I would already be hard to breathe through a morph suit. So I was content on my first iteration of my paper model but you may not be its okay to make tests just ensure you learn from your mistakes and use your past models as a reference for where to scale next!
Step 6: Surgery Time!


Since the model I used was meant as a paper weight and not a mask we need to make some changes to the paper model. I just took some scissors to the back of the head until I could fit the mask over my face. Once the hole in the back is large enough for your face you can stuff the paper mask with aluminum foil (Use tiny pieces to fill the beak) this is so we have something of substance to build upon later. Once filled to the brim with aluminum foil you can use duct tape to seal up the back. This makes sure the foil doesn't fall out in the next step.
Step 7: Tape Your Model to a Base

You want to ensure you have something in the rough shape of a human head so that the mask can be worn easily. I'd recommend a mannequin head, if I had one but I didn't so I had to improvise. I used a spider-man face shell, but in retrospect I should have just bought a mannequin head from amazon. The foam ones are cheap and will make this process a whole lot easier. However in my case I just took some plastic wrap and wrapped it around my faux mannequin head. Then I duct taped the paper base to the mask as seen in the photo above. I recommend adding tape around the base of the paper model so it doesn't shift while adding clay. Once secured properly we can move on to the next step.
Step 8: Marking and Removing the Eyes + Bulking the Top


When assembling my paper model I think I made a mistake because the eyes pointed out instead of inwards. However to remedy this I cut they eyes out. I first marked the area I wanted to remove and they cut it with an exacto knife. The hole left is where we will add the see through black mesh in a later step.
Another thing you might want to do to save on clay is add aluminum foil ridges at the top of the head. I noticed that in some of the concept art for the executioner's mask there was these portions of overlap I wanted to add and decided it added a little more detail to the mask. However if you are going to do this I recommend using a little less foil than I did I think I made mine a little too bulky. However its up to you where you draw the line.
Step 9: Paper + Glue = Strong


The paper base is hard to add clay upon, so we need to make the paper base stiffer. The way I did this was with paper mache. I first mixed a bowl of half a cup of water and half a cup of glue. This gluey liquid was a strong way to bind the paper to the base, I also found paper towels work especially well because they absorb more water. So use this technique to go over all areas of the paper model, making sure to double over areas with weaker stability. Then allow to dry for at least a day. It will make things harder in the future if the paper mache is still wet. Once dry we can start adding clay.
Step 10: Clay Base


Now that we have something to build off of we don't have to work as hard getting the shape of the mask and can start building off of what we already have. So start going over the base with a thin layer of clay. This will add extra thickness so we can add the majority of the clay in the next step. However try to keep this base layer smooth, a good way to do this is wetting your finger in a glass of water and rubbing the wrinkles out of the clay.
Step 11: Main Layer of Clay + Markings


Now we can go ahead and add a slightly thicker layer of clay on top to start and give the mask some shape. When adding this layer make sure you don't leave any fingerprints or marks in the clay as they will show up in the final product. I recommend smoothing out this layer at every step, or waiting until a part dries to use as a grip so you don't leave a mark.
When you've added you next layer of clay we can add markings onto the clay, these marking are areas of detail seen on the executors mask. Areas like around the eyes, in triangle shapes along the beak, and in strips on the top of the head. These marking are optional but can help when adding the detailing later on.
Step 12: Detailing


Adding details is a tough process, especially around the eyes. To start roll a chunk of clay into a round strip, we are going to place this strip around the eyes of the mask, once placed we can start to smooth it out around the eye until we get a ridge like shape around the eyes that smooths out gradually, we want it to look like a hill leading up the the eye and then a steep drop towards the middle.
Another area of detail is the lines on the beak, we can add these by making 4 similar round strips and placing them over the lines we marked. Once placed we want to smooth them out with just a little bit of water. If the strips start to merge together you can separate them with the back of a pen going gently in-between the ridges until they start to take shape again.
Finally for the raised portions on the top of the head you can take thicker pieces of the strips of clay and you can smooth them out, ensure the actual ridge is more defined than mine. I didn't make the ridge too clear and it looks a little too subtle on my finished piece.
Additionally when the mask dries after this step you can remove it from the mannequin head and take out all the aluminum foil, just be careful not to crack the mask. If the mask cracks you can super glue the pieces back together and follow the next step to hide any cracks it may have left behind.
Step 13: How to Fix Cracks


If you notice your mask starts to crack (If you are using cheap clay like me this will most likely happen) you can use gap filler you'd use for filling holes in your walls. I used some generic stuff we had lying around but when it dried it sanded down super easily. Leaving me with a super smooth result with absolutely no cracks. Just make sure to wear a respirator when sanding this stuff because it can be really harmful if it gets into your lungs, especially if you used a lot like I did.
Step 14: Base Coat of Paint


To make this mask look like a real skull I wanted to paint it accurately, so to do so I went over the mask with a light peachish color, this color can be made by adding a lot of white, some yellow, and a pinch of red. You could also buy this kind of color but I prefer to mix it myself so I'm sure I have the right color. Once you go over the whole mask with a base coat LET IT DRY I cannot stress that enough. If the paint is cheap or like me you used a cheap white paint to mix the color it could ruin the washes in the next step ruining all the subtle detail and smearing the delicate coat you initially put. So it's better just to wait don't be impatient I'd recommend an hour or 2 under the sun or maybe 3-4 hours if inside.
Step 15: Creating and Using Washes


Making washes is easy and using them is even easier, you can buy them in small quantities from hobby shops but this method is much easier and much cheaper. What you want to do to create a wash is you want to get a cup of water and add a small amount of paint to the cup. This watered down paint is called a wash. The purpose of a wash is to age an object and to add years of grime a paintbrush just couldn't do. You can then start to mix the paint in the cup until you get very thin watery paint. Then with this paint you can smear it all over your mask. I'd recommend doing this in sections at a time because sometimes your fingerprints can smear the paint. However when you have the wash spread on your mask like in the second image you can dab a paper towel to soak up most of the paint. You don't want to rub because if you rub the paint with a paper towel it will leave streaks which don't give off as strong of an effect. Once most of the wash has been soaked up by the paper towel you can see the paint weathered the mask this is the intended effect. You can also apply this effect with a thin layer of black (As in watered down more) to get an even more grungy effect. Once you are content with the washing you can let the mask dry on its own just to make sure there's no moisture left on the surface that could ruin the paint job.
Step 16: Function Over Fashion


In the actual game Pathalogic 2 the Executor's mask has these eyes that are sunken in and are bright yellow. I thought this look really good but I couldn't think of how to make this mask wearable while also having those eyes so I had to compromise. I had this black mesh lying around my house and realized it worked well for eye holes. I was able to glue them behind the eye holes with a hot glue gun and they held in place perfectly. So while this mask isn't a perfect replica it still resembles their masks enough to be called an Executor's mask and that's good enough for me.
Step 17: Dry Brushing


In nature sometimes layers of dirt and grime can get bumped or scratched off upper layers of materials. You can see this in a lot of things, and a way to emulate this effect is called dry brushing. It's exactly what the name entails, you have to dip your paintbrush in some paint like white to simulate bone. Then you wipe almost all the paint off your brush. Once most the paint is wiped off you can go over the raised edges a few times a subtle amount of paint will remain only on the raised edges. It's a nice way to add a subtle effect and really adds to a piece like this.
Step 18: Straps


I didn't take the best photos for this step but it's pretty self explanatory. I took some strips of elastic (I only had white so I painted it black) and then glued them to 3 places on the inside of the mask. The three places I glued too are the inside of the top, and on both sides next to the eyes. To ensure the mask can support it's own weight I reinforced the inside with super glue, and then on top of that I did a layer of hot glue just to make sure it was all secure. Once the hot glue dried the mask was able to support its on weight, so I was able to wear it out to get some awesome photos.
(Just a tip, around this step you can add a layer of clear coat so that the paint doesn't fade over time, though this is optional)
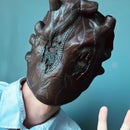
Step 19: Ta-Da! You're Finished!


Wear your mask around and get ready to scare people on Halloween. This costume was a little rushed so I didn't have enough time to finish the robes this year, so maybe a project for next year. If you made this I'd love to see some photos. This was a fun project and only took a few days for a result that is sure to scare some kids on the block this Halloween. I recommend if you make this mask that you also get a black morph suit and a hoodie with it. It really adds to the effect when people try to look inside your hood and can't see anything. And on that note I wish you luck with your crafting endeavors and a Happy Halloween to you!

Participated in the
Halloween Contest


Comments
1 year ago
:O I'm the person who originally uploaded that model to pinshape-- you've done some incredible work here!!! I'm so glad to see it put to amazing use