
Introduction: Post Apocalyptic Masks


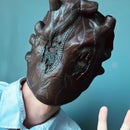

While the world may feel like its ending we aren't there quite yet. Giving you ample time to prepare and while doing that why not look the part. Masks are mandatory may as well look awesome in one while you are forced to wear one.
Making Post-Apocalyptic masks are easy it can be finished in a weekend it only took me a day to finish one so with this guide you can be rocking the end of the world look well in advance.
(Please note: These masks are not medical grade, you should still wear a face-mask underneath if your state makes masks mandatory)
Supplies
1.) EVA Foam Floor Mat
2.) EVA Craft Foam 1mm
3.) Scissors
4.) Box Cutter
5.) Dremel
6.) Hot Glue Gun
7.) Wires
8.) Paints (Blue, Silver, Black, Brown, Yellow, Or what you feel is appropriate)
Step 1: Basic Shape


Mask Shape?
To make these masks you need a basic shape for your mask that you can add detail on to later. First off you need to make the foam to trace on. Cut up the EVA foam mat into chunks and then glue them back together like in the photo above. Once completed you can trace a mask into the foam, what I did to get the shape for mine was I bought a cheap face mask and traced the shape on to the foam (You will need 2 of these to make both sides of the mask, if your foam has a texture on the bottom make sure to reverse the pattern on the second piece). Cut along the lines and you got a very simple shape.
Weathering: Part 1
We'll be doing this a lot so get ready. Take both your pieces to any road or driveway and just rub the smooth side of your foam against the asphalt if it starts to scratch that's good once you think its damaged enough we can move on to the next step.
Assembling the Shell
When making the shell the foam may prove hard to force together so what you need to do is cut the curved edge at an angle on both pieces, Once that's done add a bit of glue at the top of the curve and hold both pieces together and repeat until you have your finished mask shape. Its okay if you have a gap in between the seam as it will make it look welded together when we paint it.
Step 2: Basic Detailing


Wires!
Trust me there's no actual wiring in this and its completely optional. Take any snipped wire just laying around and get those thinner wires inside the wire. This will be a key feature in the mask. Next take a wooden skewer and poke 4 holes in the mask in a very thin rectangle shape. Thread the wire through the holes and hot glue the ends behind the mask so the wires don't move. Repeat if you want more wires sticking out of your mask.
Scrap Connectors
Cut thin strips of foam like in the images above and glue across the seam of the mask. Make sure not to make them perfectly even or else it will look "Too good" and we can't be having that in the Post-Apocalypse.
Lines
Draw some lines of where you want details on the mask. I painted these with warning stripes but you can use different colors when we get to that. A good tip is alternating thickness in the lines this makes it look worn and "Post-Apocalyptic"
Step 3: Screws


Screws
This step is a little dangerous so if you feel uncomfortable then feel free to skip it. I added small screws that were just small enough to barely poke through through the foam. To actually get the screws through the foam I just screwed the screws through the foam with a screwdriver. Once that's in put lots of hot glue on the pointy bit sticking out the other end to ensure it doesn't cut your face.
(I am in no way accountable if you get injured during this step if you feel unsafe please skip this part)
Weathering: Part 2
Get ready to rub the mask against more asphalt! if any foam flakes off it's up to you if you want to glue it back or not just depends on what you think looks best, you just want light scratches the next step is where we get deeper scratches
Step 4: Weathering


Weathering: Part 3
Take your dremel and just go ham, mine is very weak its designed for doing your nails but I use it for foam detailing. I have a bit that is basically a mini drill and I used that to drill small holes a tiny bit of the way through the mask. Using a proper sanding bit make some deeper gashes in the foam and make sure to just go ham adding small scratches all over
Step 5: Rivets


Riveting Rivets
With your hot glue gun make tiny dabs of hot blue on both ends of each connector piece. Ensure each dab of hot glue is large enough to see. If the piece ends up in a spiky shape (Because hot glue) then cut the tips off. Repeat steps around the edge of the mask with spacing that seems reasonable so it will look like a rivet like in the photos above.
Step 6: Paint Time!


Base Coat
On the mask make a base coat of silver paint. I used spray paint which will be preferable for the next few steps. Let that dry ensure nothing happens to this coat as its the most important coat.
Middle Coat
Now I understand this looks bad but this step is important. This will add a very small hint of blue to the whole thing when we are finished. Take some cheap blue paint and put a glob down, put some paint on your finger and just rub it in everywhere on the mask until the entire thing is an ugly shade of blue.
Step 7: Fixing the Ugly Colors


Fixing time!
Take some black paint and put it into a glass you don't plan to drink from. With the black paint at the bottom of the glass water it down, a lot. When you got your watered down paint coat a small bit at a time and wipe it off while the blue paint is still wet it should mostly wipe off with the watered down paint. Do this enough times and the silver becomes a dark silver with a hint of blue. If you wanted too you could interchange the color in the last step to have a hint of it peeking through although I highly recommend blue I just think it looks best, but its up to you.
Step 8: Stripes


Detailing stripes
Paint the extended bits with a base brown coat, this will show when we do an overall watered down black coat. Once the brown coat dries you can add a thick coat of yellow over-top if the yellow seems a bit bright we will dull it down later. Once the stripes are painted yellow we can move on to the next step.
Step 9: Black Stripes


Details on the Stripes
With your thinnest paintbrush paint on some black stripes. I did this freehand to ensure it didn't look too "perfect" but on areas like the 'T' part ensure the black lines up or it will make the mask look off.
Step 10: Dark Coat


Dark Coat
While the black paint is still mostly dry go over the whole thing with a coat of that watered down black, and wipe it off immediately. Over the rivets add a little more and let it dry without wiping it off, this will bring more attention to the rivets without making them too obvious. This is almost our last bit of painting just a little more left.
Step 11: Rusty Screws

Rust
If you added screws then get the tiniest bit of brown paint and add a dab of paint onto them. Then dab it off with your finger. When a tiny bit is left like in the picture let it dry.
Step 12: Actual Strap


Head Strap
I used a wire because I liked the look of it for the mask but you can use some black elastic band. I don't have any tips for measuring the band around your head Just wrap it around your head with the amount you think you need. If you have elastic then cut less than you think you need so it stays on tight. If you used wire like me then you will need to drill small holes in the sides of the mask, I used my dremel. Once you have the holes drilled you can fill the holes with hot glue and and stick the wires in. (You may need to support the wire with a little more glue around the hole)
Step 13: Enjoy


Your mask is finished enjoy it, make sure to rock that end of the world style. If you want you can try other designs like the other mask I made pictured at the beginning. These are just the basic principles but you can expand on them much more to create any design you want.
If you made this I would love to see photos, I poured a lot of love into this and I'd love to see your creations also!

Participated in the
Sticky Stuff Speed Challenge


3 Comments
2 years ago
This is so cool!!!!!!!!!!!!!!!!!!!!!
2 years ago
Cool project. How is it in terms of airflow?
Reply 2 years ago
It’s hard to breathe sometimes, I left a bit of a gap at the bottom for air flow. That’s why I insist it’s not a proper mask. But this could probably be fixed by using thinner foam.