
Introduction: Monster Mask (Meter Tall)


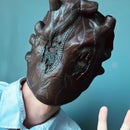

Hello everyone, this year for Halloween my family asked me to make all of their Halloween costumes, and with me only recently getting a 3D printer I really wanted to show off what it can do I think the best way to do that is by building a Demon mask that is a meter tall. Now when building this it took me a little under a month in printing times and waiting for parts so I could fix my printer. However if you were to work on it non stop you could probably get the mask finished in a week or two. Depending on your painting experience. But with a rough time frame you can expect with building this mask we can get right into materials needed.
Pretty big side note: If you don't have much time or you actually want to be able to fit through doors there is a version of the mask that doesn't have horns. I will cover the full process of how I made the mask without horns and then how I made the mask with horns. I will note at the top of each step if you should skip this when making the horned version.
Supplies
1.) 3D Printer
2.) The 3D files (Purchased here)
3.) Glue (Hot glue, Super glue)
4.) Various paints and paintbrushes (Purples, Reds, Blues, Browns, and Blacks)
5.) Gap filler
6.) Sandpaper
7.) Lots of Filament (Around 1kg)
8.) Elastic Band
9.) Memory Foam (Small Amounts for padding)
10.) Black Cambric
Step 1: Wait and Realise 3D Printing Wasn't As Fast As You Thought


Now once you purchase the 3D printing files from Gamebody you can slice them up in a program of your choosing. I used around an 8% infill and a 0.08mm layer height. This makes the mask sturdy and also makes it so the layer lines aren't too obvious. I experienced some stringing in my prints. An issue I'm too lazy to fix but didn't hinder the overall project. (I'll show a technique to easily clean up stringing in a later step).
Once everything is setup you can start printing. To start all you are going to want to print are the main face part, and the jewel in the middle of the head. Additionally if you are making the version without the horns you want to print the T-shaped part that goes over the head. If you are printing the whole mask, horns and all you are going to want to hold off on printing any more parts for now. If you want horns on your mask do not print the T-shaped part that goes above the head. This is a forehead piece for the mask without horns and you will waste filament printing that if you want horns. But with that out of the way I'll see you in 2-5 days when those first 2-3 pieces have printed.
Step 2: Remove Supports and Check for Damage


Now you can remove the bottom part of the face from your print bed, take this chance to clean up any stringing you may notice and make sure you don't snap any of the details when tearing off supports. I used Cura as my slicing program and their auto-generated supports can get into areas that make it awkward to actually remove. Once you've checked for any mistakes and removed supports we can get moving onto the next step.
Step 3: Assembly + Sanding


(If you are making the horns version of the mask skip this step, but before doing so save the first image it will help with your version of assembly later.)
Once everything is printed we can start gluing everything together. The T-shaped piece forms the upper part of the head. It should slot perfectly inside the crease between the eyes. We can apply some hot glue on the seam to make sure that sticks together. If you have a temperature adjustable hot glue gun make sure the temp doesn't exceed 200 degrees or else the plastic could melt, weakening stability. And once you have your glue on and the parts in place be sure to let the glue try. I wanted to be extra safe so I used super glue along the seams too. Just to make sure this thing is never coming apart, so let that dry too. Once your glue is all dried you can apply the gap filler everywhere on the mask in a thin layer using more between the seams. Be generous with this because if you add too much you can always sand it off. Once applied however you should read the instructions on your gap filler to see how long you should wait. And when sanding always wear a respirator, especially with dealing with dust like this it can be very unsafe. But once sanded you should have a smooth result that will result in a natural look with no seams or layer lines. This is the ideal outcome, and what we are going to have to do a lot in later steps.
Step 4: Strapping It to Your Head


(If you are doing the horn version the straps are in a different location for a part you haven't printed but the same principals apply.)
For this step I got the elastic had lying around and put it into the slots on the mask (As seen in the first and second photos) after sliding it in it was a really easy job of applying super glue and letting it dry. And to be extra safe I added a layer of hot glue on top once dry just to ensure this mask doesn't fall off any time soon. And as you can see in the photo it fits. A little tip however when measuring how much elastic to use add a little leeway because we you can add memory foam inside the mask as padding so your nose doesn't get destroyed.
Step 5: Painting the Little Gem Thingy


Painting the gem is probably going to be the easiest paint job of the whole project. But first we have to prepare it for painting. Its the same as the other parts where we apply a thin coat of gap filler across the whole thing and then sand that off. This is an easy way to hide layer lines and I recommend it a lot. Once prepped we can get to painting so to get started we want to cover the whole gem all over in a coat of silver paint, and we just want to let that dry. Once dry we can use a wash of black all over the gem. To create a wash you just water down some cheap paint you can get from a craft store and smear it all over the object you want to wash. Once its covered in the wash we can dab all the watered down paint off with a paper towel. Remember this because it's a step we will be using a lot later on.
Once finished with the washes we can go over the detail areas on the inside of the gem with red paint. I went over it with 1-2 coats to make sure it looked faded, this adds a subtle story to the gem. Next I went over the red portions with a black wash dabbing that off once complete. Finally we do one finally wash with red paint to give the metal a layered look and to add detail to the final piece. We don't want the red to be too noticeable so make sure to water it down a lot. A good tip to note is if you accidentally go overboard with a wash you can add water and the paint will come off when dabbed with a dry paper towel.
Step 6: Painting the Whole Mask


(If you are making the horn version you can skip this step as we cover it later but it's good to keep note of what we are doing here because it gives a better idea of the desired effect)
So painting the mask is definitely the hardest part of this whole process. But here is how I got it down to a concise guide. First we want to take out the gem, it shouldn't be glued in in the first place but if you have it resting in the slot remove it. Next we can coat the whole mask in a layer of black paint (If you printed in white filament save some time don't paint the teeth those need to be white, I just accidentally painted over them) Once the whole mask is coated in a layer of black paint we want to go over the whole thing with a thin layer of red, don't cover the mask in multiple coats but also don't water the paint down. You want to stretch the paint as thin as possible across the mask using as little as possible but also so it's noticeable, like in the images above. Once we added red we can repeat the same step with a purple. Making sure to make it a super thin coat over the whole thing. This will give a layered effect adding texture to the painting on top of the texture from the actual print. Next is a subtle step called dry-brushing. we get some blue paint and wipe almost all of it off leaving almost no paint on the brush. Then we starting painting all over the mask. This paints all the raised edges with a subtle blue color, this adds more layers to the overall piece. (Also if you painted your teeth black without thinking now is the time you want to paint that back to white.)
Step 7: Griming Up the Teeth


The teeth at the moment are too white and we want to change that, because a monster like this would never floss. So the way we can do this is by using more washes, YAY! For the grime I used a mix of brown and yellow making sure not to mix it all the way then watering that down and applying that to the teeth. Once the paint has gotten into all the little crevasses you can dab that off with a paper towel making sure not to take off too much near that bottom as that's where realistically the most grime would reside on teeth in real life.
Step 8: Years of Dirt in Minutes


(People making the Horn mask this is touched upon briefly in step 20 but it's better explained here)
You guessed it, we are going over the entire mask again in one big wash. For this step I recommend getting a disposable cup and pouring 1 part paint : 4 parts water. This is a very light final wash to make sure the blues and purples merge more cohesively together creating a subtle blending effect. Additionally the brown adds a layer of grime over the whole thing making some portions look like dried mud. I do recommend however recommend to avoid doing the teeth again, they can stay the way they were as they have more complicated colors going on.
Step 9: Hiding Your Mouth


We want to make the mask look amazing and a way we can add to the effect of us being a monster is hiding our mouth behind the monster's mouth. The way we do this is by using this black fabric, its the same kind of stuff they use under sofa's to keep stuffing from falling out over time. And I found this fabric is super breathable perfect for our use. So to apply the mesh to the mask you need to cut a piece to length. I just stretched the fabric over the mouth hole and cut to size. Next you can put a ring of hot glue around the mouth and stick the fabric to that. I didn't use super glue for this step as it makes the fabric stiff. Once the fabric is glued we can go along the edge with an exacto knife cutting the excess fabric, we want a gap of about half a centimetre between the glue and the fringe. Keep in mind it doesn't need to be perfect no one will really see the inside. Once the excess fabric is trimmed we can apply an extra layer of hot glue around the loose fabric we cut around. This will make it so when you wear the mask it doesn't itch as much, and with that the mask is looking a lot better.
Step 10: Protection for the Future


(If you are making the horned version keep in mind you will need to do this when you are done painting)
Once fully painted you can apply a coat of clear coat. I recommend using a coat of matte clear coat spray paint. Go over the whole mask 3-4 times waiting for the mask to fully dry between each coat. And with that you've finished the simplified version of the mask. You can be content and stop here or if you are making the larger version of the mask keep watching because its going to get a lot more hectic.
Step 11: Change Your Mind?

Lets say you don't like the look of the simplified version and you want to make the horned mask instead. You can but it won't be easy. First we have to remove the forehead piece from the top. We can do this by getting a heat gun and melting the glue in-between the seams. Keep going over the seams until the forehead part rips right off. Just be extra careful to not warp the plastic as you may have to restart. But if all is successful we can get started with the horned version of the mask.
Step 12: Print, Print, Print


When looking at the diagram from step 3 you can see we want to start with printing the pieces that are to the left at the bottom. These pieces will act as a forehead piece and allow a natural transition into the horns. So while you are waiting you may as well pop on a good 14 movies because you will be here for a while. (The settings in Cura are the same for this step)
Step 13: Making a New Forehead


To start assembly we are going to glue the 2 pieces we've printed so far along the flat seam, using the same method we've used of Hot glue then Super glue down the seam. Once the parts are glued we can coat the entire part in a thin layer of gap filler. Make sure you put extra along the seam so that we can hide that when we sand it later on.
Next up we can start to sand down the whole part. Make sure the entire part is fully dry before doing this. Because when I started sanding when it wasn't dry and it wiped off meaning I had to reapply it, and wait all over again. But once dry you can sand everything down nice and smooth. And with with that we can move on to the next step.
Step 14: Painting Again


So before gluing this new part to the main portion of the mask we can save some time by painting now. Something I didn't realise when painting was that the raised bit I didn't paint were parts that are meant to be skin so you can paint the entire piece. I do this later but it's easier to do this now. Now when painting this we can repeat the same steps we used prior of priming black, going over in thin coats of red then purple, and finishing off with a blue dry-brush and brown wash. If the paint dosen't match up perfectly we can touch that in a later step when we wash over the whole mask.
Step 15: Merging the 2 Parts


Finally we can start assembling our 2 halves, around this step we can also glue the gem into its slot on the forehead. Make sure you add extra super glue around the gem because hot glue isn't the best at holding the gem in place. But with that we can connect the 2 pieces together using our same method of a line of hot glue, letting that dry and adding super glue, then applying gap filler and letting that dry. I should repeat my warning when sanding always wear a respirator as the dust this can produce can be really nasty to breathe. But with a smooth seam and all the parts connected we can move on to finishing up the last of the printing.
Step 16: Print Anything Remaining


Now's a good time to rewatch the entirety of the office for a 3rd time because we will be here for a while. We need to print out all 6 horn pieces. I recommend printing everything individually using the same settings as before. However if you want you can print the last 2 horn pieces in one print keep in mind though that this caused stringing for me, an issue I will address in a later step.
Step 17: 2nd to Last Assembly


With everything printed we can almost assemble everything. We can really build up the horns by stacking the meatier pieces up on top of the ridge, keep in mind you can tell where it lines up by keeping track of the texture on the skin, if the pattern transfers over then you have it right. Another note is for the meatier pieces they might be printed upside down so keep that in mind when finding orientation. And another thing when gluing make sure to use as much glue as possible, because when people pick up this mask people like to pick it up by the horns so you want that to be the strongest part. And with that add gap filler and sand the seam, its okay if around this part the sanding is a bit light because the added texture from the gap filler make things look more natural. And with that you can repeat these steps for the first part of the horns. A small thing to note when adding the horns however is there is a tiny portion of the meat piece that sticks out (You can tell because it's a different texture) This meatier part goes on the front and lines up with piece underneath. (You can see what I'm referring too in the 6th photo)
Step 18: Remove Stringing


If when printing you experience stringing you can easily remove it without having to reprint. Stinging happens when I print multiple things in 1 print so here's how to remove it. When holding the piece take your bed scraper and scrape the edge of the piece, make sure your fingers are out of the way and you never point the blade towards yourself. With that you keep repeating this motion making sure not to dig into the plastic but to just scrape the top. Once all the major bits of stringing have been taken care off you can pick off the last bits of stringing with your fingers. And viola you have a cleaned up part!
Step 19: Finally Its Whole!


We've made it this far all that's left is to glue the last bit of the horns to the top piece, Make sure to also add extra glue to this part as I've noticed this piece wobbles a bit, probably because I didn't add enough glue. And with that you can coat any areas you haven't coated yet with gap filler and sand that down. Once its all sanded you are finished with assembly, you've done it! Now on to painting, thankfully this next part won't be too hard.
Step 20: Paint and Color Match


This step will take a little bit of experimentation finding the right colors, but start with the basics of a base coat of black, then adding thin coats of red and purple, and finishing up with a blue dry-brush and brown wash. I found if you can't get the colors to match perfectly around this step you can always use some washes on the areas that stand out more. It darkens the overall colors and makes the color difference more subtle. Additionally if the color is a lot lighter than the original then you can always try washes in different colors. I found my initial paint job didn't match too well so I added a wash of black and that darkened it up to a much better color that matched the original. Also around this step if you used a filament color other than white I'd be painting the horns white in preparation for the next step, which is.......
Step 21: Painting the Horns


Painting the horns wont be too hard, its just using a lot of washes this time however it will be a lot more noticeable. First we want to hold the mask upside down to prevent runoff and we want to do a black wash for one horn. Make sure you get your paintbrush into the grooves. Then we can start to dab the paint off, if the paint drys during this step you can wet a paper towel and rub some of the darker areas off. You are aiming for around the color I got in the second photo. Once you finished one horn we can repeat with the next.
Once the black washes have dried we can get to the real grime, we want to use a brown wash now. When using the black wash we dabbed a lot off but with a brown wash we are going to apply a lot at the base of the horn and drag it up with the paintbrush. Keep repeating this until your horns look really dirty. If you cant get the merging effect to work well you can also coat the entire horn in a brown wash, dab that off, then go over the base and again and dab that off lightly. It will make it look like dirt had gotten caught around the horns after many years. But with the horns painted you are finished so let's look at some better photos!
Step 22: Finished!


Congratulations, we made it through a lot but if you've finished this mask I'd love to see photos. This mask took me about a month to make but I had a number of problems, like my printer broke at least 3 times (All from my own stupidity) But if you print non-stop you could get this done in time for Halloween hopefully
And with that I'm off happy Halloween I hope some of you can get lots of candy with this mask. Or if you are a bit older then I hope you can win best costume because with the effort put into this because at that point you really deserve it.
Thanks for Reading!

Runner Up in the
Halloween Contest


5 Comments
Question 1 year ago on Step 22
What is the gem thingy for? does it light up? it looks like you cover it up in the final steps.
Answer 1 year ago
In the final few steps it isn’t as visible but it’s still there. (You can still see it in some of the final product photos still if you look closely) The gem piece is added decoration but, I haven’t added lights into it yet, however that might be a good idea for next year!
1 year ago
Nice Work small issue with the link in the supplies section it does not work sadly
Reply 1 year ago
I'll update that now I think instructables cut the link off short it can be found here while the edit is pending review https://www.gambody.com/3d-models/dota2-doom-mask
Thanks for letting me know!
Edit: The link has now been properly fixed!
Reply 1 year ago
No Problem I just thought it best to let you known as soon as possible so you could fix it