
Introduction: Spiral Puzzle - 3D-Printed - Wire Bending


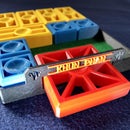


The task of this little puzzle is to get the elongated rectangle of copper wire out of the spiral. After a few tries, you will manage to solve it! By the way, also a nice little gift for friends!
The idea of this puzzle is not new. Often they are industrially produced designs. Originally I had planned to make it completely from copper wire. However, I found out that it is almost impossible to bend a spiral with even spacing, not to mention bending it evenly round. Also, the wire, when viewed over its entire length, is too thin and would bend very easily. So I decided to design and print the spiral.
At the end there must be an eyelet that is perpendicular to the spiral. However, this cannot be printed in one piece, so it would have to be printed separately and then glued, which would not hold reliably with such a small adhesive surface.
Then I had the idea to make the eyelet movable and out of copper wire. A hole at the end of the spiral is enough to attach a copper ring. Now it was obvious to make the removable puzzle part out of copper wire, too.
There are different versions in the world, but this one is certainly unique!
Supplies

For this project you need:
- 3D printer
- filament (red, yellow, blue)
- copper wire, approx. 30 cm, Ø 1,3 mm
- cutter
- wire pliers
- soldering iron
- solder
- file
- something round with approx. Ø 25mm
- third hand
- super glue
Step 1: Printing - 2 Variants


Variant I
If you choose variant I, then you must print:
- "Spiral Puzzle.stl" (3x, different colors). Pictures 1-3.
After printing the 3 different colored parts must be glued (Step 2).
Variant II
- "Spiral Puzzle_4.8mm.stl"
No superglue required! (Step 2 is then omitted)
For those who work with the "Prusa Slicer" and know a little, a tip from RyanW171: in the "Prusa Slicer" there is the possibility to set an x in different heights. The printer then stops after reaching the height. You can then change the filament … just follow the instructions on the screen. Works very well! Many thanks to RyanW171 for the tip!
To make sure the 3 colors get an even height, I changed the spiral in height and set the total height to 4.8mm (original 1.5mm x 3 = 4.5mm), so that an x can be set every 1.6mm in the slicer.
Only when all x's are set, click on "Slice now".
Print settings:
- printer brand: Prusa
- printer: Mk3s
- supports: No
- resolution: 0,2
- infill: 30%
- filament brand: ICE
- filament color: Bold Blue, Young Yellow, Romantik Red
- filament material: PLA
Remark: As all parts are designed to fit very precisely, it may happen that you have to rework one or the other part a bit with sandpaper and/or cutter due to different dimensional accuracy of the printers and the different behavior of the filaments.


Step 2: Gluing


Now you need:
- the printed parts
- super glue
Place a small drop of superglue on the blue spiral about every 1.5 cm. Then place the yellow spiral flush and press firmly for a few seconds. Then, as with the blue spiral, apply superglue to the yellow one. Now place the red spiral flush and press firmly again for a few seconds. The tricolor spiral is complete!
Step 3: Bending Ring


After you have glued the spiral, you can go on with the next step. You need:
- copper wire, about 10 cm
- cutter
- something round, about Ø 25mm.
- pliers
I had plenty of copper cable left over from other projects. For the ring you need about 10 cm, which must first be stripped. This can be done with a cutter.
To form a properly round ring, it is useful to do this with the help of a round object with about Ø 25mm. I took the socket of an E27 light bulb. First, let the ends overlap and then cut them with pliers so that they are flush against each other.
Step 4: Insert Ring and Solder


For this step you need:
- the tricolor spiral
- the ring
- soldering iron
- solder
- file
- third hand
When soldering the joint of the ring, it must be noted that the copper wire has a very high thermal conductivity, which can result in the PLA softening or melting at the point where the ring passes through the hole or on the spiral arc.
Therefore, it is imperative that the area where the ring touches the PLA material is protected. With a "3 hand" you can position both parts so that the ring has no contact with the spiral.
Afterwards, rework the rough soldered joint with a file.
Step 5: Bending and Soldering Removable Part


For the copper wire rectangle you need about 20 cm, which again must be stripped.
With the pliers I used I could bend the 12 mm sides without problems ... just bent a right angle to the left and right. On the open side I overlapped ends and then soldered them. The result should be a rectangle of about 80 x 12 mm.
Step 6: Insert Removable Part


Of course, to make the puzzle "sharp", you need to know how to insert the removable part. Here are a few explaining pictures!
And the whole backwards to get it out.
Have fun with this little puzzle! You know the solution ... your friends or whoever will definitely do some fiddling to get it done!

Participated in the
Colors of the Rainbow Contest


16 Comments
2 months ago
That's looks awesome! Too bad I don't have a 3D printer...
Reply 2 months ago
Thank you! I'm glad you like it!
Question 3 months ago on Introduction
would this be possible to cut the spiral out with a scrollsaw to make this puzzle, and if so could you supply a PDF pattern?
Answer 3 months ago
Definitely problematic as the spiral touches the various grain structures. Where the grain is at 90 degrees to the spiral, there is a very high risk of breakage. Maybe you should choose the wood a little thicker than the original (5mm). Maybe more like 6 or 7mm. All in all I am rather skeptical about it.
I would rather recommend sawing the spiral out of a plastic plate (acrylic or polycarbonate glass).
Attached is a pdf with a template. Good luck!
Reply 3 months ago
Acrylic is rather brittle and wouldn't be a good material. The plywood is a better choicse as its cross-grains help keep it sturdy. It'll look quite good in wood!
Reply 3 months ago
You may be right. Plywood would be worth a try!
Reply 3 months ago
Thank you for you help and suggestions. I am going to try using baltic birch plywood. the 6mm thickness is made up of of multiple layers so I think it is worth a try.
Reply 3 months ago
It would be nice if you report if it worked!
Answer 3 months ago
Maybe thick plywood, as you could avoid knots, as solid wood may have those.
Reply 3 months ago
Would be worth a try. Maybe it works!
3 months ago
Beautiful and elegant. Well done. If you click on the x on the slider to the right of the sliced object in Prusaslicer, you can have the printer stop and switch out the filament, no supergluing needed!
Reply 3 months ago
Thank you for the positive feedback! Changing the filament with the Prusa slicer is a good tip! Thank you!
3 months ago
Nice colourful project.
Reply 3 months ago
Thank you for the positive feedback! Colorful ... specially designed for the "Colors of the Rainbow" contest!
3 months ago
Fun puzzle! What program did you use to design it?
Reply 3 months ago
I'm glad you like it! With Tinkercad.